BROWSE BY CATEGORY

Wednesday, May 31, 2006

Tender Pork

I had a bit of cold this past week, so I haven't had a chance to update my blog. While I was sick, my wife and I got to catch up on some of the TV shows. I have Media Center on my computer, which can operate like Tevo, so we record whatever we are interested in. It's nice since we can fastforward all the commercials. We had been going out or busy for some reason or another, so we were about 30 hours worth of TV shows behind. Nice thing about having it on my computer is that we can skip all the crap. On some shows, like American Idol, we can watch the two hour show in an hour, since we fast forward all the commercials plus any time Ryan Seacrest is speaking.

Speaking of which, the gray haired Taylor Hicks won the Idol. Some article compared to him as the PT Cruiser, he is old but he is also new. I thought that was funny. I heard that this season was better than the previous years. I enjoyed the finale with all the guests this year. Hopefully the producers can make the next season just as successful and entertaining.

Alright, so this site is supposed to be for "easy Japanese recipes" but I think I will post some difficult recipes once in a while. When I say difficult, all that means is that it just takes more time, like butanokakuni I'm introducing today. There doesn't seem to be any official name for this dish in English, so I'm going to call it "tender pork." I read on Obachan's Kitchen & Balcony Garden blog that it's commonly called "braised pork belly" or in Hawaii called, "shoyu pork" but they didn't strike me, so I decided to choose something else. My wife used to call it "two-day pork" since the izakaya near our apartment in Yokohama advertised their kakuni as "super tender from being cooked for two days."

IN JAPANESE: buta-no-kakuni
CATEGORY: Meat
COOKING METHOD: Boiled
DIFFICULTY: Difficult
SERVES: 2 people
LENGTH OF TIME: 4 hrs

INGREDIENTS:
1 lb of big pork chunk
1 tsp oil
6 half inch pieces of ginger (see TIP: Ginger)
2 green onions (just the green parts)
1 cup of sake
1 TBsp brown sugar
1 TBsp regular white sugar
1/2 cup soy sauce
1/4 cup mirin
some daikon (optional)
2 boiled eggs (optional)

HOW TO:
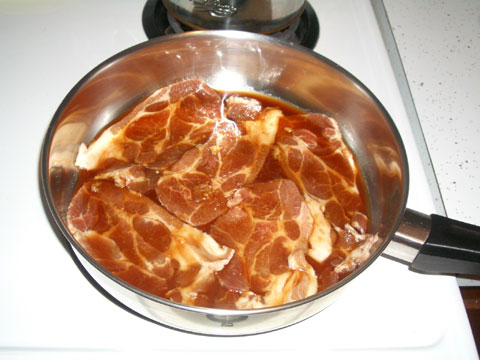
Normally in Japan, people use the fatty belly part of the pork for this dish. But I find that most American people, including my wife, take the fat off when they eat. What a waste, considering that about a third of the belly meat is fat. So this time, I decided to try using a non-fatty pork part. I'm not sure how common this is, but I found a pork chunk called "country style ribs" at my supermarket, which oddly was boneless.

First cut your choice of pork into pieces. They should be about twice the bite size.

In a sauce pan, drop about a teaspoon of vegetable oil and turn the heat to medium. When the oil is hot, put the pork pieces in the pan. Rotate the pieces on all sides until they are no longer pink on the outside. Fill the pan with 2 cups of water and 1 cup of sake (I used 1/2 cup of cooking sake and 1/2 cup of real sake), and reduce the heat to low. Add pieces of ginger and green parts of the green onion as well. Don't use the lid, as the alcohol in sake needs to evaporate.

Let it simmer for 2 to 3 hours (if you have time, I recommend 3 hours, but 2 hours is fine, too). While you let it simmer, add some water every half an hour to make sure that all parts of the pork stay under the water at all times.

Tear a piece of pork after it had been cooking for 2 to 3 hours and make sure it's really tender (it should be from all that sake and cooking!!) Then take out the ginger and green onions out. If possible, take the pork pieces out, and strain the soup into a separate pan, so you will have much cleaner soup stock for the next step.

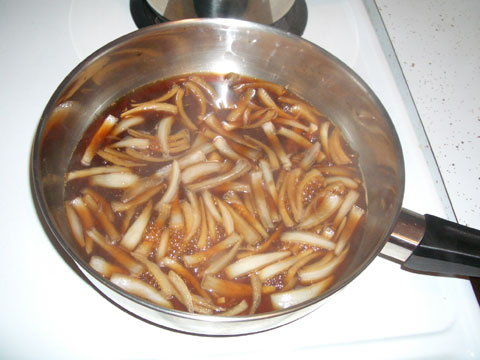
Place the pork pieces back into a pan with cleaner soup stock. If you want to add daikon and boiled eggs, this is your time to do it. Just make sure that water level is higher than your food (if not, add more water). Add 1 table spoon of brown sugar and another table spoon of regular white sugar. If you don't have brown sugar, 2 table spoons of regular sugar is fine, too. Also add 1/4 cup of soy sauce and 1/4 cup of mirin. Let it simmer on low heat for half an hour.

Add 1/4 cup more of soy sauce, and let it simmer for half an hour longer. Adding this half of soy sauce later helps pork from getting too salty from soy sauce. And the pork pieces should be mighty tender by now. You could garnish it with thinly sliced white part of the green onion like I did.

Wednesday, May 24, 2006

Simple Cabbage Salad

Are Virgos considered to be anal organizational freaks? I've never heard of that until recently when I came back to the US. Several people have pointed that out to me. Even at one job interview when I talked about how organized I was (I gave examples of how anal I was), they seemed impressed, and then asked, "wait, what sign are you?" When I responded that I was a Virgo, the interviewer said, "I knew it!" Apparently, he was a Virgo, too, so he claimed that he could tell. Hmmm.

I was also reading a random blog the other day, and came across some woman's blog that said, "my four year old daughter loves to help me fold laundry, but she doesn't fold like how I want, even after I repeatedly showed her how to do it my way. I want my dishcloth to be folded in thirds, not by halves!!! But it's nice of her, so I let her fold them, but when she's done, I re-fold all of them over again. I know, I'm anal, but I'm a Virgo, so what can I do?" What? You've got to be kidding me! That's anal! When I told this story to my wife, she laughed and said, "you used to do that to me all the time! You tried to teach me how to fold clothes, YOUR way." Did I? Hmmm, I don't recall. If there are any other Virgos out there that think they are anal, or not anal, please tell me.

So today, I'm going to show you something really really simple. As the name suggests, this salad is quite simple (maybe too simple for Virgos?)

IN JAPANESE: kyabetsu no shiomomi
CATEGORY: Side-dish, vegetarian
COOKING METHOD: Fresh
DIFFICULTY: Easy
SERVES: 2 people
LENGTH OF TIME: 3 min

INGREDIENTS:
1/4 fresh cabbage
1 tsp lemon juice
some salt
shiso leaves (optional)

HOW TO:
The hardest thing about making this salad is shaving the cabbage. If you have a whole cabbage, slice about quarter off. Then using a big knife, shave off as thin as possible. If you have a shredder, by all means, use it. If you are lucky enough to have some shiso leaves, slice that into tiny pieces.

Place the shredded cabbage (and shiso leaves) into a bowl, and pour about a tea spoon of lemon juice, and two to three shakes of salt on top. Mix well, and it's done!

When my dad makes this, he sometimes adds some sour apple pieces in it.

Friday, May 19, 2006

Soba (cold)

I have a great story about cold soba noodles. When I lived in Japan, one of my Japanese friends started dating a Navy guy. We were looking for a place to eat for lunch, and decided to eat soba since this guy has never had it before. It was a fairly warm day, so we suggested that he try the cold tempura soba, since that was the restaurant's speciality. He was one of those easy going guys that was willing to try anything. The only thing I was worried about was that most of the Americans I know (including my wife) aren't a huge fan of cold noodles. But he still said he would try it. The rest of us ordered hot soba noodles or katsudon.

When the food arrived, my friend and I were caught up in some conversation, and didn't think to show the guy how to eat soba properly. He picked up the cup with soup in it, and tried to pour that over the noodles. Luckily, we caught him before he made a huge mess, and told him that he was supposed to put the noodles in the soup cup instead. My friend and I went back into our talk until we heard, "Oh man, it's not gonna fit." He was trying to shove all of the noodles into a tiny cup, and now the soup was flowing out from the top (he still managed to put about a third of noodles into a tiny cup).

OK, so I didn't tell him that you are supposed to take a small portion of the noodle and dip that into the soup each time. But come on, do the math! We were trying to be nice about it, but I just couldn't stop laughing. On top of that, he started eating tempura with his bare hand as if they were chicken strips. Despite of being laughed at, he said he enjoyed the soba, but maybe he will try the hot noodles next time since it looked much easier.

IN JAPANESE: Zaru soba
CATEGORY: Rice/Noodles
COOKING METHOD: Boiled
DIFFICULTY: Easy
SERVES: 1 person
LENGTH OF TIME: 10 min

INGREDIENTS:
1 bunch of soba noodles
2 TBsp of soba tsuyu soup base
chopped green onions (optional)
some wasabi (optional)
some dried nori (optional)

HOW TO:
To make this, you need to get some soba noodles. These are dried noodles, so they will last for a while. If you know you won't be eating much, there are smaller packages available.

I used to make soup stocks from scratch, but that takes a while (since you need to heat it up, and then cool it down), so I recently started using the soup mix, which wasn't bad. It's definitely easier.

Boil one bunch of soba noodles in a pan of boiling water. If your soba noodles didn't come pre-bunched, then you are out of luck! You are just gonna have to look at the back of the package to see how many servings are in the bag, and divide it accordingly. I know... that's pain.

While the noodle is being cooked (it should be about 5 minutes, but check the package direction, too), pour about 2 tablespoons of tsuyu soup into a soup cup. If you don't have a soup cup (like me), use the fanciest looking coffee cup that you have, or regular glass would work, too. Tsuyu soup usually needs to be diluted 3 to 4 times with water. So if you are using 2 tablespoons of tsuyu, add 6 to 8 table spoon of water.

I like lots of "topping" with my soba, so I chop some green onions and add a little wasabi into my soup. If you have fresh shiso leaves, those are great for topping, too. Just be sure to dip the noodles into the soup instead of otherwise!

Wednesday, May 17, 2006

Yakitori

I recently noticed that beer tastes better in Japan. I'm not talking about Asahi or Sapporo tasting better than Bud or Miller (though they do, in my opinion). To be fair, let's use Heineken for example. If you order a draft of Heineken, I just think it tastes better in Japan than it does here in the States. I thought maybe it was the climate. There's nothing like an ice cold beer in a hot humid summer evening in Japan. Compared to that, Seattle, especially, doesn't have much humidity in the summer so I don't crave beer as much. But then I thought about it some more and realized that the key point was "ice cold."

Most bars and especially izakayas in Japan keep their beer mugs in a freezer, so it's icy cold when they get it out to pour your beer. Sometimes, it's so cold that you find thin ice pieces floating on top. But I noticed that majorities of restaurants, and especially bars in the US don't bother putting their beer mugs in the freezer. Usually, they are stacked up on the counter at a room temperature. If you are unlucky, sometimes your mug is fresh out of the dishwasher that it's hot! There's been a couple of times I got my beer, and I could've warmed up my hands by wrapping my hands around it. And worst of all, sometimes I can taste the detergent. What a way to ruin a good beer.

While I'm on the topic of beer, I thought I would show you how to make yakitori. It's basically grilled chicken on a stick.

IN JAPANESE: Yakitori
CATEGORY: Side-dish
COOKING METHOD: Grilled
DIFFICULTY: Medium
SERVES: 2 people
LENGTH OF TIME: 15 min

INGREDIENTS:
chicken, preferably thighs
some salt (preferably sea salt)

HOW TO:
The toughest part about cooking yakitori is chopping up chicken thighs into small pieces and putting them on a stick. I usually use thighs since they are more tender than breast meat. I normally buy a big pack of thighs, make bunch of sticks, and freeze them.

Yakitori will taste the best if you grill it over charcoal, but if you have something like George Foreman Grill, that would work as well (though it won't have that grill flavor!)

There are two common ways to flavor yakitori; sea salt or teriyaki sauce. Most hardcore yakitori fans (like my wife and I) tend to prefer salt, because it simply goes better with beer. Whatever is your preferece, put some salt or sauce on the chicken, and then start grilling.

Rotate the chicken about every 2 minutes. It can take a while to cook in between the pieces, so I normally create a bit of spaces between each pieces to speed up the process.

Monday, May 15, 2006

Fried Rice

I went to a music/comedy event at University of Washington this past weekend. Mos Def, Mixmaster Mike (of Beastie Boys), Phantom Planet were some of the musicians that performed. Music wise, I was most impressed by a hip-hop unit called Blue Scholars. I had never even heard of them before, but they are apparently Seattle's up-and-coming one MC, one DJ duo. I guess their album available on iTunes, so they must be fairly popular.

For this event, I was mostly looking forward to see Carlos Mencia perform his standup. I recently caught him on Comedy Central and thought he was entertaining. When he came on the stage, the crowd got into it, but I noticed a few people booing and shouting, "you suck!" and "you are stupid!!" He tends to do a lot of racial jokes, so I guess some people found him offensive. Before he took a break, he apologized to the audience that his intension is not to hurt people's feelings, but he's a comedian, so it's his job to be stupid and make fun of things, and that they shouldn't take him seriously. It was kind of weird. I guess at events like these, not everyone is going to be his fan.

Today, I'll introduce fried rice. I guess this is more of a Chinese food than Japanese, but fried rice and ramen (and gyoza) are considered a standard set in Japan, so I figured it's ok. There are packets of fried rice powders, and I have tried them before, but who knows what kind of chemical is in there.

IN JAPANESE: Chahan
CATEGORY: Rice/Noodles
COOKING METHOD: Stirfry
DIFFICULTY: Medium
SERVES: 2 people
LENGTH OF TIME: 15 min

INGREDIENTS:
2 bowls of rice
1/2 cup of mixed vegetable
1/4 onion
some shrimp or meat
1 egg
1 TBsp vegetable oil
1 half inch piece of ginger (see TIP: Ginger)
1 TBsp soy sauce
some salt
some pepper

HOW TO:
I usually make fried rice when we make too much rice, and I need to store the leftover rice in a fridge for a day or two. Those actually work better than freshly made rice when cooking fried rice.

Pour about a table spoon of oil into a wok or pan and cook your preferred meat or shrimp. If you are using bacon, (which is what I used), you don't need to use any oil, as bacon gives plenty of oil for cooking. I recommend using bacon, sausage, ham or shrimp for fried rice as those already have salty flavor. After about a minute, add onions to the pan.

After your meat/shrimp look mostly cooked, add the frozen vegetables and cook until most of the water evaporates.

Push the meat and vegetables to one side of the pan, and cook the egg on an empty space you have just created. If I'm not using sausage or bacon that's already salty, I normally add a bit of salt to the egg as I scramble it into tiny tiny pieces.

Then add the rice to the wok/pan and mix. When the rice is evenly mixed together with meat and vegetables, shred the ginger on top and add the soy sauce and pepper to the mix. Taste test to see how it tastes, and if needed, add some salt.

If you want to serve kind of fancy like the photo, scoop the fried rice into a little bowl, press gently, and place it upside down on a plate.

Thursday, May 11, 2006

Edamame

If peanuts is considered to be the typical beer snack in the US, I think edamame is the closest thing to that in Japan. The English translation of edamame is "boiled soy bean in pod" or "green soy beans."

I haven't met anyone that doesn't like edamame (but I know plenty of people that doesn't like peanuts or worse, allergic to it), except one of my American friends that visited me in Japan a couple of years ago.

I told him, "you gotta try edamame, it's really good," and he tried to decline politely, "actually I've tried it before at some Japanese restaurant in Texas, and I didn' t like it." What? How could he not like it? He must've had some weird ones from Texas.

I still ordered it and when the waitress brought a bowl full of edamame, I insisted that he try them again. He hesitated but said, "okay, fine" and picked one up. Instead of taking the peas out of the pod, he stuffed the whole thing in his mouth!!! I was so shocked that I couldn't say anything for a second, until he spitted it out saying, "yeah, I don't like these too much." Then I burst out laughing, and after I calmed down, I explained to him that you don't eat the pod/shell part. "Ah, much better. These actually taste pretty good," he commented. So, I still don't know anyone that doesn't like edamame.

If you are familiar with edamame, you are probably thinking, "how can you introduce how to make edamame?! That's like introducing how to make an instant noodle!" but recently I found out that a lot of people didn't know how to go about eating edamame at home. Basically, all you need is a bag of frozen edamame and some hot water. It's that easy. I told you this is the "easy Japanese recipe" site.

IN JAPANESE: Edamame
CATEGORY: Side-dish
COOKING METHOD: Stirfry
DIFFICULTY: Easy
SERVES: 2 people
LENGTH OF TIME: 5 min

INGREDIENTS:
1/4 bag of frozen edamame
some salt

HOW TO:
The most important thing is finding a bag of frozen edamame. Most Asian supermarket should carry it in their frozen food section.

Boil water in a pan with some salt, and pour about 1/4 of the bag (for two people, roughly).

Some should start floating, but it's probably ready to eat in 3 to 4 minutes. Remember, when you buy it frozen, it's already cooked, so all you are doing is defrosting it in the hot water, so there's no need to overcook.

Drain the water out, and serve on a bowl. I usually sprinkle some salt on top when I serve. Don't forget to have an extra bowl out on the table for the pod/shell.

Squash & Bacon

I don't think it's the squash season right now, but it was on sale, so I bought one, or half I should say to make squash & bacon. I'm not even quite sure if this is Japanese food, since I never saw it at any restaurants or izakayas in Japan. But my mom, who practically only cooked Japanese food, used to make it before she turned into a super health freak during my teenage years (bacon definitely didn't rank in the same "healthy" category as brown rice, spinach and homemade natto), so I'm calling it Japanese food.

The mixture of salty bacon and sweet kabocha pumpkin is harmonious. Plus, this recipe doesn't call for any salt or sugar. It's all from the natural sweet taste of kabocha and that irresistible processed salty taste of bacon combined together.

While we lived in Japan, my wife complained that she couldn't get good bacon there (she loves bacon). I never really noticed much difference, and I still don't. I guess the American bacon smells better when you are cooking. It has more smoked smell or something (see, I told you I'm not really a chef).

IN JAPANESE: Kabocha to bacon no butter itame
CATEGORY: Meat, Side-dish
COOKING METHOD: Stirfry
DIFFICULTY: Medium
SERVES: 2 people
LENGTH OF TIME: 15 min

INGREDIENTS:
10 crescent-cut kabocha pieces (see TIP: Kabocha Squash)
4 slices of bacon cut into bite size
3-4 mushrooms (or if you can afford it, shimeji mushrooms)
2 TBsp of butter
2 TBsp of sake (preferably real sake, not the cooking sake)

HOW TO:
Cook the slices of bacon on low to medium heat to your preference. My wife likes it crispy and I like it not crispy, so we compromise and cook until they are slightly crispy. When the bacon is done, your pan should be filled with bacon grease so dump those out to a bowl or container. Don't use the paper towl to completely soak all of the grease. You need a bit of oil in there.

Keep the bacon in the pan, and turn the heat back to medium and stirfry the kabocha slices and mushrooms for 3 to 5 minutes until the kabocha starts to turn slightly brown.

Splash about 2 table spoon of sake in the pan (be careful!) and let the alcohol burn off. I said to use the real sake instead of cooking sake because cooking sake usually has some salt in it, and that could make this dish taste slightly salty.

When most of the liquid has evaporated, lower the heat to low, and add butter. Stir the pan gently so the melting butter can spread around evenly. When most of the butter has melted, seal the pan with a lid, and let it simmer for about 3 minutes until kabocha gets soft. And that's it!

We normally have a bit of leftover with this recipe, but it tastes great the next day, especially as bento. My wife packed the leftover for her lunch. She thought it looked cute, and suggested that I take a picture of it.


Wednesday, May 10, 2006

TIP: Kabocha Squash


Kabocha is a type of squash found in Japan. I think some people also call it "Japanese pumpkin." Kabocha has an extremely hard green exterior, but inside is yellow-orange colored and tastes very sweet. If you've ever had tempura before, the chances are you've eaten kabocha before. Other than tempura, it's commonly used for nimono (simmered in soy sauce, sake and mirin) in Japan.

Although it's smaller than American pumpkins (it's about 6 to 10 inches in diameter), if you don't have a large family, it can be difficult to finish the whole kabocha. If you are lucky, you may be able to get the half cut size at the grocery store, but chances are slim. Plus, once the kabocha is cut open, it can grow mold fairly easily.

The best way is to cut them up in pieces, and freeze it. There are a couple of ways you can cut kabocha pumpkin. The exterior is extremely tough, so be careful when you cut it. I recommend using a knife with jagged edge (like a steak knife). First, I cut the kabocha in half, and scoop out the seeds from the inside (as you would do to melons). I normally cut kabocha into two different cuts.

Crescent-Cut: Like the name suggests, it looks like a crescent moon. Each slices should be less than half-inch thick, and 3 to 4 inches long. This cut is ideal for tempura, squash & bacon, or miso soup (cut one of these slices into much tinier pieces). Be sure to cut off the green exterior. It's much easier to cut those off once you cut kabocha into these smaller pieces.

Chunky-Cut: Another common cut is the chunky cut. Each pieces should be about an inch and half to 2 inches thick/long. These thicker chunkier pieces are ideal for nimono. Again, cut off the green exterior skin.

Normally I put about 10 pieces/slices into a baggie, and put those baggies into a big ziplock bag, and stick that into a freezer.

From one normal sized kabocha, you could probably get at least two bags of each cuts (with about 10 pieces). They are sweet and tasty, so I highly recommend trying them. Just remember to be careful when you cut them!

Tuesday, May 09, 2006

Yakisoba

I've been doing some over-the-phone and face-to-face job interviews this past couple of weeks. The other day, I had an interview with a high profile company in downtown for my second interview. Before my interview started, I asked if I could use the bathroom. To my surprise, they called a big security guy and had him escort me to the men's bathroom. He waited for me outside the door with his thick arms crossed. That's some security they got going there.

A couple of weeks ago, I was getting myself to start a mini-Atkins diet, where I reduced eating carbs like rice and noodles. But then I talked to some of the people that have tried it, and they all said the same thing; "I lost 10 to 20 lbs in a few months, but as soon as I started eating carbs again, I gained it all right back." Well, I could cut down rice and noodles for a couple of months, but if I am going to gain it back then I didn't see much point in continuing.

So, today I'm introducing yakisoba. My wife isn't a huge fan of noodles (including pasta), but somehow she loves yakisoba (probably because it's stirfried in oil). If you have ever been to Japan, I'm sure you've come across yakisoba stands, at festivals or in front of random train stations. The smell of yakisoba sauce sizzling on a hot pan is irresistible.

IN JAPANESE: Yakisoba
CATEGORY: Rice/Noodles
COOKING METHOD: Stirfry
DIFFICULTY: Medium
SERVES: 2 people
LENGTH OF TIME: 15 min

INGREDIENTS:
1 Pack of yakisoba (usually have 2-3 bags of noodles)
assorted vegetables chopped in bite size (cabbage, onion, carrots, asparagus, mushrooms, etc)
your choice of meat or shrimp
some beer if you are drinking (optional)
1/2 TBsp sesame oil
1/2 TBsp vegetable oil
some pepper
shredded seaweed [nori] (optional)
pickled ginger (optional)

HOW TO:
The most important part is buying a pack of yakisoba. You can usually find something like shown on the photo in the noodles section, or possibly in the frozen-food area. These usually come in pack of 2 or 3, with packets of sauce.

There are instant yakisoba noodles (comes packed similar to Top Ramen), but I recommend the fresh noodles instead.

Pre-heat your wok or frying pan with mixture of sesame oil and vegetable oil. When the oil feels hot, throw in the meat and chopped vegetables and stir-fry. While you do this, place the packets of noodles near the stove so they will warm up and loosen up a bit.

If you are drinking a beer as you do this, feel free to splash some into the pan, or water will do if you don't like to drink as you cook. When the meat (or shrimp) is fully cooked, add one of the sauce packets and some pepper, so your veggies will have some flavor.

Hopefully your noodles are warm by now. Loosen them with your hands as you drop them to the pan, and mix well for 2 to 3 minutes.

Add rest of the sauce packet and mix until the color of sauce looks even. Garnish with dried seaweed and pickled ginger and serve.

Monday, May 08, 2006

Ginger Sauteed Pork

It was a busy partying weekend for us. Friday was Cinco de Mayo. Our friends Justin and Cherish that used to teach English in Japan invited us over for dinner. Originally we were thinking of going out to some Mexican bar or restaurant, but Justin insisted that he cook authentic Mexican food for all of us. He has no Mexican blood in his genes, but I have to admit that he makes really good Mexican dish. My wife doesn't like avocados, but somehow she likes the guacamole Justin makes. That should tell you something. We enjoyed the dinner and Mexican beers.

On Saturday, we invited all our friends to Howl At the Moon, which is a cool dueling piano bar. We went there about a month ago and won a free party for 100 people. I heard everyone that fills out the form wins, and sure enough both my wife and I won. Since we had just recently moved back to Seattle, we still don't know that many people, but thanks to our friends' friends, I think we had about 30 to 40 people. For the party, they served free BBQ pork sandwiches and garlic mashed potatoes.

Today I will introduce ginger sautéed pork. This might sound odd, considering that I have this recipe site, but I usually don't like to look at recipes when I cook. Most of the Japanese food that I make, I have learned to make from trial and error (and believe me, I've made plenty of errors). I would have to say that I had the most trouble with ginger sautéed pork [buta no shoga yaki] by far. I've tried numerous different ways; soaking the meat in the sauce overnight, covering meat in flour, and stirfrying in wok, but I just couldn't get the pork to be tender. Recently I finally managed to come up with what I consider to be the best way to cook ginger sautéed pork.

IN JAPANESE: Buta no shoga yaki
CATEGORY: Meat
COOKING METHOD: Stirfry
DIFFICULTY: Medium
SERVES: 2 people
LENGTH OF TIME: 10 min

INGREDIENTS:
5-8 thin sliced pork
1 half inch piece of ginger (see TIP: Ginger)
2 TBsp soy sauce
2 TBsp mirin
1 TBsp sake
1 TBsp water

HOW TO:
Add soy sauce, mirin, sake, water in a bowl, and shred a piece of ginger to the mix.

Mix thin sliced pork into the bowl and marinate until the meat is covered in sauce.

Pour the meat and sauce into a flat bottom pan (don't need any oil), and then turn on the heat to low (don't preheat the pan!). You would want to place the meat flat like shown on the picture. Since this is being cooked in low heat, it will probably take about 5 minutes before the pork starts to cook.

When 90% of the meat is cooked (turned brown as opposed to red), flip the meat over to completely cook the raw parts.

Serve next to some shredded cabbage (pour the sauce over the cabbage as a dressing).

Thursday, May 04, 2006

Shrimp & Tofu Stirfry

I've heard the buzz on American Idol while I lived in Japan, but I didn't realize how big it was until we recently moved back to the States. This is the fifth season of the show, but it's my first time watching it. After thousands of people auditioned, top 12 (6 guys 6 girls) were chosen, and every week, one person is eliminated by number of votes from telephone and text messaging system.

Last night, the 17 year old Paris Bennett got voted off, and now there are four remaining; soul-patrol, Talor Hicks; rocker Chris Daughtry; guy-next-door type Elliott Yamin, and camera friendly Katharine McPhee. I'm happy with those final four, but let's look back on what I thought when the show started.

TOP 4 I PREDICTED
Chris Daughtry
Kellie Pickler
Paris Bennett
Ace Young
TOP 4 I WANTED
Chris Daughtry
Taylor Hicks
Katharine McPhee
Jose "Sway" Penala

So my prediction was quite off, but most of the people I wanted to see in the final four made it, so I guess America agrees with me. It will be interesting to see who will end up being the final two. My votes are on Chris and Taylor, but we'll see. I have never personally voted though.

Today, I'll introduce one of my favorite "let's make something with whatever is left in the fridge" dish. I usually have some tofu (see TIP: Storing tofu) and some kind of veggies in the fridge. And I always have frozen shrimp (see TIP: Shrimp) so this makes it perfect. I actually invented one evening when I didn't know what to make for dinner.

IN JAPANESE: Ebi & Tofu itame (I made that up)
CATEGORY: Seafood
COOKING METHOD: Stirfry
DIFFICULTY: Medium
SERVES: 2 people
LENGTH OF TIME: 15 min

INGREDIENTS:
10 shrimp peeled (see TIP: Shrimp)
1/4 pack of tofu diced (see TIP: Storing tofu)
3 mushrooms
1/4 of onion
some carrots
1 clove of garlic finely chopped
1 TBsp vegetable oil
1 TBsp sesame oil
1 TBsp sake
3 TBsp oyster sauce
some ground pepper

HOW TO:
Slice some carrots, mushrooms, onions and whatever veggies you want to include (baby corn, celery, cabbage to name a few). Dice the tofu into about one inch cube, and finely chop the garlic.

Heat up your wok or frying pan on high with vegetable oil and sesame oil, and after the tip of the wok/pan is hot, put the chopped garlic (if that doesn't sizzle then your pan is not hot enough!) and let it sizzle so the oil will have garlic flavor soaked in.

Dump in onions and carrots first, stiry fry for about a minute, then add mushroom and shrimp, and stirfry until the shrimp begins to turn into a nice pink color. Add some sake, and after that evaporates, add the tofu and carefully stir so you don't break the tofu too much.

When that's mixed well, throw in oyster sauce and some ground pepper to flavor, and stir until oyster sauce is evenly coated around the veggies, shrimp and tofu. It might be easier to serve this on top of bowl or rice and eat with spoon if your tofu has crumbled like shown on my photo.

TIP: Shrimp

I think most people do this, but I usually buy a big pack of meat, divide them into two servings and freeze them, instead of buying a small portion and going to the grocery store every day. I used to do the same for shrimp, except recently I learned that you can buy a pack of frozen shrimp that is easy to peel.

I also realized that shrimp we get at grocery stores were always "previously frozen" so there was no more need to get the "fresh" shrimp anymore. Plus, you could get a bag of 50 to 60 shrimp for about $5. What a deal. But the best part is how easy it is to peel them, and the black intestine on the back is already taken out. So all you have to do is defrost how many ever you want to use, and peel the shell. That's it.

When I'm cooking stirfry or yakisoba and forgot to defrost meat overnight, I usually use these frozen shrimp. I take out about 10 from the bag, let it run under water, and it's ready to be peeled within a minute.

Beef Bowl

I've been working the past couple of days. For those of you that doesn't know, I am currently job-hunting, so I have lots of free time, other than occasional interviews. My friend that works at temp staffing agency knows this, so she asked if I could fill-in to work at this warehouse for two days, putting small valves and nuts into plastic baggies to be shipped out. It sounded like an easy job for $9/hr, so I said I would do it.

The job was easy, but since I had been sitting in front of the computer all this time, being on my feet all day was quite exhausting (am I getting old?!). I knew I had to get proper dinner to refuel my energy, so I decided to make some beef bowl [gyudon].

For those of you that have ever lived in Japan, you would know that beef bowl is like Japanese version of fast-food. Yoshinoya, by far the most popular venue, is like McDonalds (though I think most of my friends prefered Matsuya). I associate beef bowl as something construction workers ate. My work was nothing close to that of construction worker, but I craved it, so I decided to make it.

IN JAPANESE: Gyudon
CATEGORY: Meat, Noodle/Rice
COOKING METHOD: Boiled
DIFFICULTY: Medium
SERVES: 2 people
LENGTH OF TIME: 15 min

INGREDIENTS:
5-oz of thin sliced beef (5-6 slices)
Half of an onion thin sliced
2 TBsp soy sauce
1 TBsp sake
1 TBsp mirin
1 TBsp sugar
1 TBsp red-wine (optional)
1 TBsp apple juice (optional)
1 clove of garlic finely chopped
1 half inch piece of ginger (see TIP: Ginger)
1/2 tsp of bonito soup stock powder [hondashi] (about 2 shakes)
Half cup of water
some pickled ginger (optional)

HOW TO:
From the ingredients list, it might look slightly difficult, but it's not. First, put half cup of water into a flat pan, and add 2 shakes of bonito powder and turn the heat to about medium.

While the pan heats up, add soysauce, sake, mirin, sugar, (red wine and apple juice if you have them) as well as the finely chopped garlic and shred the piece of ginger into the pan. Let it shimmer for a minute until all the ingredients are mixed together.

Add the thin sliced onion into the pan and let it shimmer for a few minutes until the flavor soaks into the onion.

I usually then use my hands to tear the thin sliced beef into small pieces to add to the pan. If you don't want to use your hands, you can use a knife, but the important thing is that you need to get thin enough slice of beef that you can tear it into pieces even with your hands.

Use chopsticks or fork to turn the beef around so it will cook evenly and let it shimmer in low heat for few minutes more until flavor soaks into the beef.

Serve on top of bowl of rice, and garnish with pickled ginger if you like. If you like lots of flavor, you can add the leftover soup over the rice [tsuyudaku].