BROWSE BY CATEGORY

Tuesday, June 10, 2008

Shrimp Seaweed Salad

I haven't had much chance to cook recently. I've been going out to lots of concerts. In the past month, I must've gone to at least 5 shows. I got to see KT Tunstall, Yoshida Brothers, and at the Sasquatch Festival I was able to check out R.E.M., The Cure, Tegan & Sara, Death Cab For Cutie, just to name a few. In the next week, I am going to three more concerts! That's a lot of money I've been spending on concerts, so I need to stay home and cook some.

I was trying to cook something healthy for a side dish, and I realized that I didn't have any fresh vegetables. But I did have some dried seaweed that can expand when you soak in water for 10 minutes, and some shrimp and edamame in the freezer. So, here's what I came up with.

IN JAPANESE: Ebi to wakame salad
CATEGORY: Salad
COOKING METHOD: Boiled
DIFFICULTY: Easy
SERVES: 2 people
LENGTH OF TIME: 15 min

INGREDIENTS:
6 uncooked shrimp (see TIP: Shrimp)
12 edamame (green soybeans)
2 TBsp of dried seaweed cut wakame
Ponzu (citrus seasoned soysauce) for dressing

HOW TO:
First and foremost! Be sure to get the right kind of dried seaweed. Don't get the kind you see on the sushi. This is the kind that's in miso soup, and it's the kind when you soak it in the water, it expands into kelp like seaweed. With that said, soak the dried seaweed in water. Normally those things take about 10 minutes to rehydrate.

While the seaweed is being soaked in water, boil water in a pan with about a teaspoon of salt, and once the water is boiled, add edamame and shrimp (still in shells) together. Both of those only take 3 to 4 minutes to fully cook, so be sure to not overcook them.

After they finish cooking, rinse both edamame and shrimp under cold water. Place them under several ice cubes to make sure they get really chilled for a couple of minutes.

Once they are chilled, peel the shrimp, and slice it in half length wise (so that it will be thin).

Take the beans out of the pod.

When the seaweed is completed rehydrated, drain all the water, and add the thinly sliced shrimp and edamame beans and mix together.

Serve on a small bowl, and add the ponzu dressing to your liking!

Monday, May 19, 2008

Mushroom Tofu

A lot of the people in Seattle have been forgetting what month it is. Yes, it is in fact May, but the weather hasn't been too kind to us, and the temperature had been somewhere from 10 to 18 degrees celcius, except this past weekend, the temperature was 31 degrees celcius.

We had some tofu and mushroom that had been in the fridge for some time, and wanted something warm, so I decided to improvise and make mushroom and tofu with sweet thick sauce.

IN JAPANESE: Mushroom to Tofu no ankake
CATEGORY: Vegetable
COOKING METHOD: Boiled
DIFFICULTY: Medium
SERVES: 4 people
LENGTH OF TIME: 15 min

INGREDIENTS:
1 package of Tofu (cut in blocks)
1/2 lb of mushroom sliced (15-20 mushroom)
2 TBsp Soy Sauce
2 TBsp Sake
2 TBsp Mirin
1 half inch piece of ginger (see TIP: Ginger)
1 tsp of dashi powder
1 cup of water
1 TBsp of corn starch
1 green onion (optional)

HOW TO:
On a heated wok, add about a table spoon of vegetable oil, and when the oil is also heated, add the sliced mushroom and cook.

When the mushrooms look fully cooked, lower the heat to low-medium and add the blocks of tofu. You are mostly trying to warm up the tofu, so there's no need to stir too hard and destroy the tofu.

Add the soy sauce, sake, mirin and the shredded ginger and stir the wok gently not to break the tofu (instead of using chopsticks or spatula, just lift up the wok and twirl it around). Once that sauce gets mixed, add a cup of water and some dashi powder.

While that water heats up in the wok, take 1 Tablespoon of corn starch and mix that with enough water (about 2 Tablespoons should do it) so all the powder dissolves.

When the water (more like soup now) begins to boil, slowly add the dissolved corn starch to the wok and stir gently. As the wok continue to boil, the soup should get thicker.

Serve on a bowl with chopped green onions on top

Sunday, April 27, 2008

Miso Chicken

I was craving some chicken, but I didn't want anything greasy. I tried to think of what I could possibly do with chicken breast pieces we had in the freezer, so I tried to bake it with a miso sauce, which turned out to be better than I expected! The photo makes it look like crossaints or some kind of dinner rolls with cheese on them, but it's chicken with special miso sauce.

IN JAPANESE: Tori no Miso Yaki
CATEGORY: Meat
COOKING METHOD: Grilled
DIFFICULTY: Medium
SERVES: 4 people
LENGTH OF TIME: 30 min

INGREDIENTS:
1 lb Thin sliced Chicken breast (about 12 pieces)
2 TBsp of Miso (white would be better, but red is fine, too)
1 TBsp of Sake
1 TBsp of Mirin
1 tsp of Sugar
1/2 tsp of lemon juice

HOW TO:
Pre-heat the oven to 400 degrees.

In a bowl, mix miso, sake, mirin, sugar and lemon juice until you get a creamy sauce.

Lightly grease a baking pan (9x13inch pan), and spread the miso sauce on each side of chicken pieces and spread them into the pan.

Bake for 15-20 minutes until the chicken is cooked. You can cut the fattest piece to see if the juice from the meat is clear instead of red (clear means fully cooked, red means still bloody and raw). That's it!

Thursday, April 17, 2008

Boiled Tofu Salad

Growing up when I was a hungry big appetite teenager, this was one of my least favorite dish as it was so brand, boring and most of all, not meaty! But yudofu, which I don't know the good translation, so I will call it Boiled Tofu Salad, is a popular traditional dish in Japan. Yu means hot water, and dofu, is tofu.

But now that I am an older man, who no longer can eat two Big Macs, I have more appreciation for this kind of food than McDonalds. If you want to get really into it, you can get a fancy kelp to get dashi and fancy tofu, but simple kelp powder and tofu from your local grocery store will do plenty good.

IN JAPANESE: Yudofu
CATEGORY: Vegetable
COOKING METHOD: Boiled
DIFFICULTY: Easy
SERVES: 2 people
LENGTH OF TIME: 10 min

INGREDIENTS:
1/2 pack of tofu (firm or soft, it's up to you)
1 tsp Kelp powder
2 Green Onions
2 TBsp of fish flakes [katsuobushi]
1 half inch piece of ginger (see TIP: Ginger)
Soy sauce or preferably Ponzu for dressing

HOW TO:
Fill a sauce pan up with water (about 3/4 full) and add the kelp powder. Heat the water in medium high.

While the water heats up, chop the green onions into tiny pieces.

When the water is close to boiling, add the tofu, which should be cut into small enough size that it can be scooped up by a regular sized spoon.

While the tofu is cooking in the kelp-based soup, add the chopped green onion into a small serving bowl. Shred some ginger and add a table spoon of fish flakes (katsuobushi) per bowl. Pour some Ponzu (or soy sauce if you don't have Ponzu) into the bowl, and that's pretty much it.

Serve with the pan/pot with tofu in middle of the table, and have each person scoop up their own tofu into their bowl. Use the spoon with holes in them so you are only scooping up tofu and not excessive amount of soup. Be careful when taking a big bite. The tofu gets really hot inside! When done eating, I normally add the kelp soup into my bowl and drink that as soup.

*Ponzu is a citrus soy sauce based dressing that is really good!

Sunday, April 06, 2008

Bamboo Rice

My mom loved to cook, and everything she made tasted good, but of course, there were a few favorites. One of my younger brother's favorites was bamboo rice. It's a simple dish, but it's so good. I remember when we were kids, my brother who normally only ate a bowl of rice ate 3 or 4 bowls when my mom cooked bamboo rice.

IN JAPANESE: Takenoko Gohan
CATEGORY: Rice/Noodles
COOKING METHOD: Stir-fry
DIFFICULTY: Medium
SERVES: 4 people
LENGTH OF TIME: 45 min

INGREDIENTS:
2 Cups of rice
1/2 lbs of ground beef or pork or chicken
1 can of green bamboo shoots
1/4 carrot or 4 baby carrots chopped thin
3 TBsp soy sauce
2 TBsp sake
1 TBsp mirin
1 TBsp sugar
1/2 tsp dashi powder
1 half inch piece of ginger (see TIP: Ginger)

HOW TO:
Wash 2 cups of rice and set it on your rice cooker with slightly less than regular water measurement. For extra flavor, I add a couple shake of dashi powder to the cooker for this partiuclar dish.

While the rice is being cooked, open up the can of bamboo shoots. You can find these at most Asian groceries, or bigger supermarket on the Asian food isle. There are pre-chopped sliced kinds, but I like getting the whole ones and chop them into chunkier pieces like shown on the photo. Also chop some carrots into thin slices.

Heat up the frying pan, add some oil and cook your choice of ground meat on medium high. While the meat is still half cooked, go ahead and add the carrots and bamboo.

Add sake, soy sauce, mirin, sugar, ginger (shredded) and 1/2 teaspoon of dashi powder and stir well. When everything is mixed (should only take a minute), change the heat to low, and place a lid and let it simmer and have the flavor soak into bamboo and meat for about 5 minutes. Make sure the heat is low enough that all the liquid doesn't dry up.

After about 5 minutes, most of the liquid should be gone (it's ok if there's some, just as long it's not more than 5 TBsp of it.

When the rice is finished cooking, mix all of the bamboo and ground meat mix into the rice and serve!

Tuesday, April 01, 2008

Bacon Wrapped Shrimp

Happy April Fool's day. It seems like Google is playing another April Fool's joke on Gmail. This year, they claim to have a new function that let's you send email with time stamp from the past. If you forget to send birthday wish or anniversary note, you can set your email sent time to whenever, and claim that you did actually sent it. I liked last year's joke better, where they claimed that they can print all of your emails and ship it to you for free.

Now, onto today's recipe. This one is super easy, and at the same time super good, and popular at BBQs. Whenever there's a BBQ potluck, we are usually asked to bring this. Bacon wrapped shrimp is a great izakaya menu and goes excellent with ice cold beer. And don't worry, this is a legit recipe (not an April Fool's joke).

IN JAPANESE: Ebi no bacon maki
CATEGORY: Meat, Seafood
COOKING METHOD: Grilled
DIFFICULTY: Easy
SERVES: 4 people
LENGTH OF TIME: 20 min

INGREDIENTS:
16 shrimp peeled (see TIP: Shrimp)
8 slices of bacon
4-8 mushrooms (optional)
8-12 asparagus (optional)
1 TBsp sake (optional)
salt & pepper (optional)

HOW TO:
Cut the slices of bacon into half. The portion of bacon and shrimp should look like the photo here. Place the shrimp on top of the bacon and just wrap it up. If you are going to be using the BBQ grill, I recommend using the toothpick to hold it into place. If not, just place it on baking sheet. Both the shrimp and bacon are salty enough so you don't need to add salt.


If you want some veggies, I recommend grilling some mushrooms and asparagus with the bacon wrapped shrimp. On the mushroom, sprinkle some salt and pepper, and on the asparagus, sprinkle salt and pepper, but also pour a bit of sake (1 TBsp for about 10 asparagus) if you will be grilling in your oven.

If you are using your oven, set it to broil and cook for 5 to 10 minutes until the shrimp and the bacon looks crisp on the outside. If you are using a BBQ grill, both the shrimp and bacon cook much faster (usually 5 minutes will do) so stay by the grill for this one.

Monday, March 17, 2008

Chicken & Daikon in Vinegar Soy Sauce Soup

Happy St. Patrick's Day! Tonight my wife made me corned beef with cabbage and potatoes, and of course, I had some Guinness as well. That was tasty.

During cold winter months, I made chicken and daikon boiled in soy sauce, mirin and sake numerous times. A couple of months ago when I held a potluck party, a friend of mine made chicken and egg boiled in soy sauce and vinegar (and mirin and sake), which tasted quite similar to my chicken and daikon (which I never had the chance to post here). My friend told me that using vinegar makes it healthier and it also makes the meat very tender. He also added that even though there are quite a bit of vinegar in it, you don't really taste the sourness. So, I had to give it a try myself.

IN JAPANESE: Tori to Daikon su nikomi
CATEGORY: Meat
COOKING METHOD: Boiling
DIFFICULTY: Medium
SERVES: 4 people
LENGTH OF TIME: 1.25 hr

INGREDIENTS:
2.5 lb Chicken thighs, drumsticks or wings with bones in it
1 whole daikon (cut in about 1/2 inch thickness)
1 package of Tofu (optional)
2 boiled eggs (optional)
6 cups of water
1 TBsp of Dashi powder (about 6 shakes)
8 TBsp of Soy Sauce
6 TBsp of Vinegar
6 TBsp of Mirin
6 TBsp of Sake
1 clove of garlic chopped in half

HOW TO:
Place the chicken in a large pot and cover that with water and set the burner to medium high. I measured about 6 cups of water, but if you are using smaller chicken pieces or larger pieces, the water you put in should cover most of the chicken. Add the dashi powder (I would say about 1 shake per cup of water you use).

While that pot is starting to cook, wash the daikon, slice it about 1/2 inch thickness. Peel the skin from each of the slices, and cut those in half (so each pieces look like half a circle). This really depends on how big of a daikon you got, but for 4 servings, you should have total of 12-18 of half circle daikon pieces. When you are done cutting them, the water should be boiling, and add the daikon to the pot and lower the heat to low.

Also peel one clove of garlic, and chop that in half and throw that in the pot as well.

By this time there should be some foamy stuff on the top. Be sure to take those out with spoon and throw it out (but try not to take out the oily part as that gives the rich flavor!).

When most of the foamy stuff is taken out (as you continue to cook, more will appear, which you can take out) add the soy sauce, mirin, sake and vinegar. For every cup of water you used, use 1 TBsp of everything, except soy sauce use about 1.25 TBsp. And like I said before, you can hardly taste any vinegar when everything is cooked.

If you want to make this dinner more filling, you can put in some tofu and boiled egg, which I ended up doing.

Put on the lid, make sure the heat is still set to low, and let it simmer for about an hour. Some of the chicken or daikon or anything else you put in may be above the soup, so occasionally stir the pot around so everything can get even amount of flavor soaking.

Friday, March 07, 2008

Crab Lettuce Fried Rice

Wow. It's been over a year now since the last blog entry. I hadn't updated this blog or answered people's comments, but recently I've noticed a sudden surge of traffic to this blog and some nice comments from people that have tried my recipe. Thanks!

So, I decided to start this blog again. Not sure how often I can update it, maybe once a week, but realistically let's say at least a couple of times a month. And to celebrate this re-start of this blog, I wanted to do something fancy, but I knew that would delay my start again, so I'm going with another easy recipe. I guess this is why this blog is called Easy Japanese recipes.

IN JAPANESE: Kani Lettuce Cha-han
CATEGORY: Rice/Noodles
COOKING METHOD: Stir-fry
DIFFICULTY: Medium
SERVES: 2 people
LENGTH OF TIME: 15 min


INGREDIENTS:
2 bowls of rice
1 can of crab meat (or shrimp for cheaper alternative)
4-5 Finely chopped shrimp (optional)
1/2 onion
1 egg (beaten with 1 TBsp of crab juice from the can)
1/2 TBsp vegetable oil
1/2 TBsp sesame oil
1 half inch piece of ginger (see TIP: Ginger)
1 green onion finely chopped
1 TBsp mayonaise
2 handful of lettuce leaves
some salt
some pepper

HOW TO:
This is another great thing to cook when you have some leftover rice. On a heated wok, pour both vegetable and sesame oil. When the oil is well heated, saute the onion until it is well cooked, and add the chopped shrimp now if they are raw (if they are pre-cooked ones, add it when you add the crab later).

While that is being cooked, beat the egg with some crab juice from the can (about 1 table spoon) in a separate bowl. When the onion (and raw shrimp) are mostly cooked push them to one side of the wok, and scramble the egg on the open side of the wok.

When the egg is fully cooked, add the rice, chopped green onion, crab meat (and cooked shrimp if you are adding) and a tablespoon of mayo and mix well. Don't worry you won't taste this mayo. It's mostly in there to give it a bit of shine. When all that is mostly mixed, add the lettuce. How much lettuce? I normally tear a few leaves to be about a little larger than a bite size (they shrink), and I add one handful of that per serving (so in this case, two handfuls, which is about 1/4 of the whole lettuce).

Right after the lettuce is added, shred the ginger, shake some salt and pepper to your liking and serve. I tried to serve it by putting it in a bowl first and flipping that out onto a plate to make it look like regular fried rice presentation, but for this one with lettuce in it, it's better to just scoop and serve on a plate.

Sunday, December 10, 2006

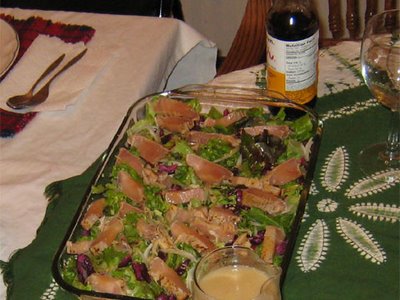
Seared Tuna Salad


For this year's Thanksgiving, held at my brother's, we were asked to bring a salad, mashed potato and beer. My wife took on the mashed potato responsiblity and I got the salad. I didn't want to bring a plain tossed salad, so I decided to try the seared tuna salad that I enjoy at restaurants.


A friend of ours from Japan was visiting over the Thanksgiving as well, and this was going to be his first turkey ever. Needless to say, he loved the whole Thanksving meal, especially the gravy, which he's never had before. For the rest of his stay, he requested leftover mashed potato and gravy for breakfast every day. He even bought packets of powder gravy as souvenir.

IN JAPANESE: Maguro Tataki Salad
CATEGORY: Seafood
COOKING METHOD: Fresh
DIFFICULTY: Medium
SERVES: 4 people
LENGTH OF TIME: 10 min

INGREDIENTS:
Seared tuna (1/4 lb)
4-8 leaves of leafy lettuce
1/8 onion thinly sliced
2-3 shiso leaves
1 half inch piece of ginger (see TIP: Ginger)
2 TBsp Japanese pickles - purple kind (optional)
4 TBsp of Ponzu dressing

HOW TO:
First, rinse enough lettuce for four people. If the leaves are huge, one leaf per person should do it. Otherwise, maybe 1 and half leaf per person. Rinse, pat them dry with a paper towel, and tear them into bite size with your hands and evenly spread on a plate or serving dish.

Slice some onions really thin and soak them in ice cold water to make them slightly more crispy. Place them evenly on top of the lettuce.

Recently a lot of supermarkets (at least in Seattle area) are carrying seared tuna in the seafood section. The only problem is that a lot of times, those are heavily flavored (with salt and pepper stuck to the tuna). If you like those kind, use those, if not, look for unflavored seared tuna or make one yourself.

The most difficult thing about making this salad is cutting the tuna. It's cooked on the outside and raw in the inside, so if you cut with jagged edged knife (like a steak knife) you could crumble a nice piece of fish. The key is to cut the fish in one pulling motion instead of going back and forth with your knife. Each slice should be about 1/4 inch side (or if you prefer a thicker cut, by all means go for it). Neatly place them on top of the salad.

If you can get purple Japanese pickles, spread those around on the salad. Also, cut the shiso leaves into small pieces and spread those around. Shred a piece of ginger on top of the salad (make sure you do it evenly so you don't have one area covered in shredded ginger!)

Pour about 4 TBsp (about 1 TBsp per serving) over the salad, and you are ready to serve!

Monday, October 16, 2006

Daikon Salad

This past weekend we already started shopping for Halloween. Every year my wife and I try to get our friends to dress up in the similar theme we come up with. Last year we pulled off The Simpsons, and this year we are going to try for fast food chain characters such as Ronald McDonald, Burger King King, Jack from Jack In The Box, and Colonel Sanders, just to name a few.

Last year there were six people doing the Simpsons, but this year we may have up to twelve people doing the fast food thing with us (are there that many characters?) We went to some used clothing stores and dollar stores to pick out some stuff. Last year my wife sewed Marge and Lisa Simpson's dresses, but this year we may not need to sew anything.

IN JAPANESE: Daikon Salad
CATEGORY: Vegetable
COOKING METHOD: Fresh
DIFFICULTY: Medium
SERVES: 2 people
LENGTH OF TIME: 10 min

INGREDIENTS:
Daikon (1/2 lb should do it)
1 umeboshi (sour plum)
2 shiso leaves
1 tsp salt
2 tsp sake
2 tsp mirin

HOW TO:
The only tough thing about making daikon salad is shredding the daikon into super thin slices. The easiest way to do that is to use the vegetable peeler (but be sure to wash the daikon and peel off the outside skin off first!)

After the daikon is sliced into thin slices, place them into a bowl. Take the seed out of umeboshi (I normally get the honey flavored since they are not as sour) and finely chop that into tiny pieces. Also slice the shiso leaves into tiny pieces as well and mix all of those in a bowl.

Add salt, sake and mirin into the bowl as well and mix well. After that put it in the fridge for a few minutes to let the flavor soak in, and it's ready to serve!

Saturday, October 07, 2006

Kimchee Pork

August and September were really busy for me. Since I started working in June, and I come home late around 8pm, my wife has been cooking 90% of the time, and on the weekend, we were out on BBQ or outdoor festivals. There were also lots of weddings and we were traveled to Las Vegas, Vancouver and Detroit.

Finally things have slowed down, and we are ready to get back to our normal life. After all those traveling, my wife and I were a bit worn out, so I decided to make some kimchee (kimchi) pork. While I was in Japan, a lot of people told me that if I was feeling weak, I should eat kimchee pork. I never really found out why, but I assumed kimchee gave more energy. Now that I think about it, I recall reading some article about some university in Korea was doing a research feeding kimchee to mice (I'm serious). The study found that mice that ate kimchee on a regular basis were healthier and had much smoother skin. Has anyone else heard about this?

IN JAPANESE: Buta Kimuchi
CATEGORY: Meat
COOKING METHOD: Stir-fry
DIFFICULTY: Medium
SERVES: 2 people
LENGTH OF TIME: 20 min


INGREDIENTS:
5-6 thin sliced pork
Half a container of kimchee (about 7 oz/200g)
5-7 leaves of lettuce (iceberg or leafy, your choice)
1/2 TBsp sesame oil
1/2 TBsp vegetable oil
1 TBsp sake

HOW TO:
Warm up your wok and pour 1/2 table spoon of sesame oil and vegetable oil. I like to mix oils like that since that gives better flavor. Keep the heat to medium-high.

After the oil is well heated, cook the thinly sliced pork until mostly cooked (when not much pink is seen), and then add a tablespoon of sake. This will keep the pork from becoming too tough.

While the sake is still evaporating, add kimchee to the wok. If you have the kind that came with a lot of juice, pour some of those in for more flavor.

When the kimchee is mostly heated, add leaves of lettuce teared into size of your palm (remember they shrink a lot, so you don't need to tear them too small!). Lettuce only needs abuot a minute to cook, so mix well quickly so the kimchee flavoring is spread throughout the wok.

Serve with a bowl of rice and get energized! But remember to have some gum or Altoids afterwards since it can leave quite a stench in your mouth!

Sunday, August 06, 2006

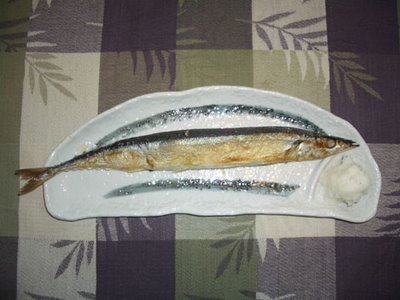
Grilled Sanma

Recently for my job, I was asked to design advertisement for "shape up goods" for a client in Japan. I used colorful small vinyl dumbbells as a key visual for the ad, since I thought they looked cute (ad was targeted mostly for dieting women) and made you think about excercising. But when I showed my design to the Japanese business team, they didn't seem to understand why I used dumbbells for the shape up ad. They thought that the ad represented more for excercise, and not for diet shape up.

I was confused as to why they were confused. After several minutes of trying to clear up each other, I learned that a lot of Japanese people don't necessarily consider exercising as a main source of diet. For them, dieting was drinking nasty green vegetable drinks or vinegars, or taking a hot bath, wearing some weird ring around your toes to make you look slimmer. It turns out that they were thinking more of massage creams and bath powders and nothing about exercising. Then I remembered that all my Japanese friends that were dieting weren't particularly working out, but instead trying out all these weird methods (I don't think any of them were losing weights).

One of the other popular method of losing weight amongst my Japanese friends were eating less meat and more fish. One of my coworkers who didn't particularly like fish, started eating sushi once a week instead of beef bowl. I think sushi can be quite high in cholestrol, especially when they are fatty.

Speaking of fish, one of the most traditional grilled fish you could get in Japanese restaurants (in Japan) was sanma (Pacific saury in English), especially in the Fall. It can be a bit of pain to eat, if you are not used to it as you need to semi-disect the fish as you eat, but they are also quite tasty so I think it's worth the time.

IN JAPANESE: Sanma no shioyaki
CATEGORY: Fish
COOKING METHOD: Grilled
DIFFICULTY: Medium
SERVES: 2 people
LENGTH OF TIME: 20 min

INGREDIENTS:
A pack of sanma (Pacific saury), which usually comes in a pack of 4
salt
4-inch piece of daikon shredded (optional)
soy sauce or ponzu

HOW TO:
I've yet to see fresh sanma sold in the States. I get them in either Japanese or Korean markets, but they are always frozen. Since it's a small narrow fish, I would say one fish per person. If there are two of you, defrost two in the fridge for a few hours.

After the fish is fully defrosted, take them out of the fridge, and sprinkle salt all over on both sides of the fish and set aside for about 10 minutes (let the salt soak into the fish)

Set your oven to broil and place the fish on a rack with a pan underneath to catch drips (there will be a lot of drips!) Broil for about 7 minutes until the top is golden brown.

While the fish is being grilled, grate some radish (which I highly recommend for this fish). Squeeze the water out of the grated daikon and serve next to the fish. Pour some soy sauce over the daikon, and eat that with the fish.

The easiest way to dissect this particular fish is to cut it open in half from the top (using your chopsticks of course), and take the bones out. Now you are ready to eat!

Monday, July 31, 2006

Japanese Hamburger

There was another food festival this past weekend; Ballard Seafood Fest. It was similar to Bite of Seattle with similar food stands, but at a much smaller scale. I enjoyed BBQ shrimp, crab clam chowder, and grilled salmon. I didn't see any raw oyster though. My wife told me that people have been getting sick from oysters from Puget Sound this season. The warmer weather is causing virus to grow inside oysters, apparently. That's too bad.

Last week, I introduced Italian fried rice, so this weekend I thought I would make Japanese hamburger. The photo didn't turn out that appetizing, but this is probably my wife's favorite dish.

IN JAPANESE: Hamburg
CATEGORY: Meat
COOKING METHOD: Grilled
DIFFICULTY: Difficult
SERVES: 4 people
LENGTH OF TIME: 45 min

INGREDIENTS:
[burgers]
3/4 lb beef
1/4 lb pork
1/2 onion chopped
1 egg (mixed with a pinch of salt)
1 cup bread crumbs
1 tsp soy sauce
1/4 tsp pepper
1 clove of garlic chopped
1 half inch piece of ginger (see TIP: Ginger)

[sauce]
1/2 cup of ketchup
2 TBsp Bulldog Sauce
2 TBsp sake or white wine
1 TBsp butter
3 mushrooms sliced
1 clove of garlic chopped

HOW TO:
Chop half an onion and a clove of garlic into tiny pieces and add that into a bowl along with all the ingredients listed on the [hamburger] list, EXCEPT for the breadcrumbs. Mix well with your hands (be sure they are clean!) I use the mixture of beef and pork since that creates more fluffy juicy burger. But if you don't eat pork, then you can omit using it.

After everything is mixed well together, add a cup of breadcrumbs. This time, mix gently so the breadcrumbs will stay as fluffy as they can without mashing everything up.

Grab about half of tennis ball in your hand, and toss it back and forth from one hand to the other to make sure the air escapes from the mixture. After a few tosses, make it flat into burger shapes. Depending on your preference, you could make four fairly big patties or six tiny pieces (my wife prefers small ones, so she can eat two instead of one big one).

Set the pan on medium high with a table spoon of vegetable oil. Once the oil is hot, place the burgers on the pan, let them cook for a few minutes until one side turns brown. Lower the temperature to low, flip your burgers, and place the lid, and let them cook for about 10-15 minutes or until the burgers are fully cooked.

If you are in a hurry, after flipping the burgers, you can pour hot boiling water about half way full on the pan, and place a lid. That would steam the burgers and cook them faster. When most of the water has evaporated, your burgers should be done.

SAUCE:
Set your burgers aside, and on the same pan (if there are leftover grease and meat pieces, even better), add butter and diced up garlic on medium heat. After the garlic pieces tunr slightly brown, add sliced mushroom, and let it cook for a few minutes until they look cooked.

Lower the heat to low, and add the rest of the ingredients (ketchup, Bulldog sauce and sake) and stir until everything is well mixed.

Place the bugers back in the pan. If you want cheese over them (I recommend chedder), put a slice on top of burgers, and cook with the sauce on low heat until the cheese melt.

Sunday, July 23, 2006

Italian Fried Rice

There was Bite of Seattle this weekend at Seattle Center, so we checked it out with a few of our friends. I'm always excited about this event, but every year, I seem to remember that it wasn't that exciting. For those of you that don't know, this event just has lots of food booths from various restaurants in Seattle. You can try tasting lots of different foods, but every year we end up eating the simlilar thing, instead of being bold and try something unique like an alligator on a stick. This year I tried spicy BBQ pork sandwich and collard green, which was pretty good.

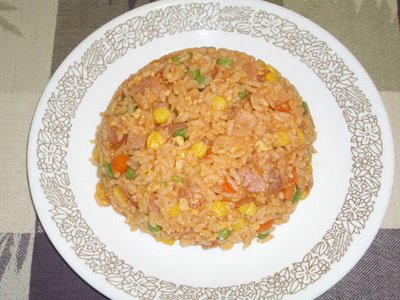
Speaking of unique food, here's a dish that sounds interesting. In Japan, a lot of little cafe offer this dish as chicken rice. You usually find this inside an egg omlet in Japan (called Omu-rice). I never had any particular name for this dish, but for this post, I decided to call it Italian Fried Rice. My wife was completely against the idea since there is nothing Italian about it, other than that I use a little of garlic and ketchup. But I think Italian fried rice sounds more appetizing than ketchup rice.

IN JAPANESE: Chicken Rice
CATEGORY: Rice/Noodles
COOKING METHOD: Stir-fry
DIFFICULTY: Medium
SERVES: 2 people
LENGTH OF TIME: 15 min


INGREDIENTS:
2 bowls of rice (leftover would be better as opposed to freshly made)
your choice of meat (chicken, bacon, ham, etc) cut in tiny pieces
1 clove of garlic chopped finely
1 TBsp of vegetable oil (omit if you are using bacon)
1 egg
1 teaspoon of sugar
1/2 cup of frozen vegetable
1/4 onion chopped finely
1/2 cube of chicken bouillon
1 teaspoon of butter
4 TBsp of ketchup

HOW TO:
On a heated wok, pour a table spoon of vegetable oil. When the oil is well heated, add the finely chopped garlic, and let the garlic flavor soak into the oil. Then cook your choice of meat along with the onion.

After your choice of meat and onion are mostly cooked, add 1/2 cup of frozen vegetable. While that is being cooked, beat the egg with the sugar in a separate bowl. When the vegetables are mostly cooked push them to one side of the wok, and scramble the egg on the open side of the wok.

When is egg is fully cooked, mix that with the rest of the stuff in the wok, and add the rice, and 1 teaspoon of butter, and a 1/2 cube of chicken bouillon powder (be sure to smash that into tiny pieces and sprinkle them over evently).

After everything is mixed fairly evenly add the ketchup until everything is evenly red.

Sunday, July 16, 2006

Yaki Udon

There was a Japanese Bon-Odori festival this weekend near the International District. My wife and I, and a couple of other friends that used to teach English in Japan went to check it out. The guys wore jimbei, which is a traditional summer wear for males, and the girls wore yukata, traditionally worn by women in the summer time. But recently there are cute Hello Kitty jimbei for girls and simple yukata for guys.

We enjoyed some festival foods like somen, yakisoba and teriyaki. There was a taiko drum show, which rocked, and we danced (or pretended like we danced) to bon-odori, a traditional Japanese summer festival dance. It was a lot of fun. On our way home late at night, we walked past some frat guys that were on their way to hit the clubs. One of them saw us in our jimbei and yukata, and yelled, "Memoirs of Geisha!" I was impressed that he was able to get the country right.

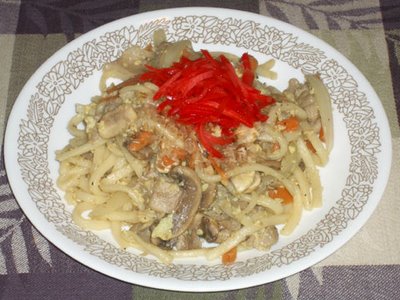
Yakisoba is a popular festival food, but I also enjoy yaki udon once in a while. It's fairly easy to make, and has more simple taste than yakisoba.

IN JAPANESE: Yaki Udon
CATEGORY: Noodles
COOKING METHOD: Stir-fry
DIFFICULTY: Medium
SERVES: 2 people
LENGTH OF TIME: 15 min

INGREDIENTS:
1 pack of udon
4 slices of bacon or thinly sliced pork
1 egg
1/4 onion
some carrots
some mushrooms
1 TBsp of vegetable oil
1 half inch piece of ginger (see TIP: Ginger)
1/2 TBsp of sugar
1 TBsp of soy sauce
some salt
some pepper
some pickled ginger (optional)
some fish flakes (optional)

HOW TO:
If you have the dried udon noodle, you need to boil and cook it as instructed. But I recommend that you use the non-dried kind. A lot of times, these noodles will come with a packet of soup power, but for yaki udon, you won't be needing that.

Pre-heat your wok and pour about a table spoon of vegetable oil. When the oil gets warm, stir fry your choice of meat, and then vegetables. On a bowl, mix egg with 1/2 table spoon of sugar (or mirin).

When the meat and vegetables are mostly cooked, push them aside, and pour the egg and scramble well. After the egg is cooked, mix well with meat and vegetables.

Add udon in the wok, and stir fry for about a minute. Shred a piece of gigner, pour 1 table spoon of soy sauce, and add some salt and pepper to your taste.

Serve with pickled ginger and fish flakes on top.

Sunday, July 09, 2006

Grilled Salmon

Today was the final of World Cup: Italy vs France. It wasn't what I expected (I expected Germany vs Brazil), but my wife and I walked to the nearby pub to watch the game from 11am. I'm not a fan of either of the team, but since I liked some of the players on the France team, I decided to cheer for them. I wore my Japan jersey to the pub (it looks very similar to the France jersey).

We got to the pub right before the kick off, but the place was so packed that we had to wait in line for twenty minutes. During those twenty minutes or so, both France and Italy had scored, so we missed that. I was quite surprised to see so many fans there. But then, this may have been the only pub showing the final in Seattle area. Congrats to Italy for winning, but more than anything, I will remember Zidane head-butting one of the Italian players. I wonder what caused him to do that.

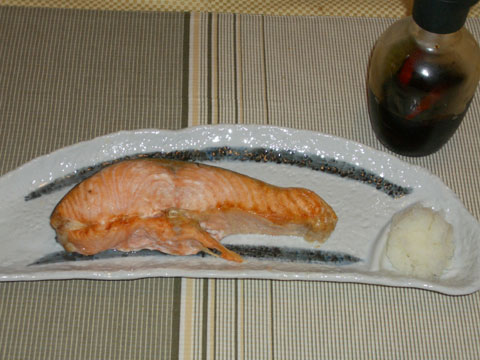
Tonight we had grilled salmon. Salmon is popular in Seattle, but we usually get the Atlantic salmon. It's cheaper and tastes better, in our opinion. This grilled salmon is a popular breakfast dish. If you go to Denny's in Japan, you can order it for breakfast.

IN JAPANESE: Yaki Shake
CATEGORY: Seafood
COOKING METHOD: Grilled
DIFFICULTY: Medium
SERVES: 2 people
LENGTH OF TIME: 15 min

INGREDIENTS:
salmon (steak cut)
some salt
shredded daikon (optional)

HOW TO:
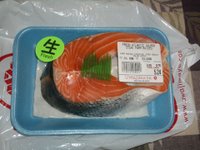
If you bought the steak cut (like shown on the picture), cut the middle part (so you get two of the same cut).

Pour salt on all sides of the salmon to your preference.

Preheat the oven to 350 F, and grill/bake for 10 to 15 minutes until the outside edge starts to turn dark.

While the salmon is in the oven, shred some daikon and serve it along side the fish. Pour some soy sauce over the shredded daikon, and eat it with fish.

Tuesday, July 04, 2006

Broccoli & Beef

It's been a week since I started working in downtown Seattle. With my new job and World Cup game, I haven't been cooking much. We've been going to George & Dragaon pub to watch the repeat broadcast (the pub records the game to show in the evenings) almost every night. So we've been eating typical bar food like burgers, fish & chips and chicken strips. Watching the games and drinking beer is exciting, but my stomach has not been happy recently.

During my trip to Europe, I realized along with my Japanese-American friend and Korean-German friend that when you are raised eating rice all the time, your body craves rice after not eating it for three days. We liked the food in Europe, but every three days or so, we found ourselves at a Chinese restaurant or Japanese restaurant just to eat some rice. It was easier in Spain since we could satisfy our need for rice from paella. My wife, who is American thinks if you are in a foreign country on a vacation, you should eat their local food. I completely agree, and as much as possible, I do try all the local goods, except my stomach needs rice once every three days or so. I wonder if this kind of thing happens to other people. Do Italians feel like they need to eat pasta at least twice a week?

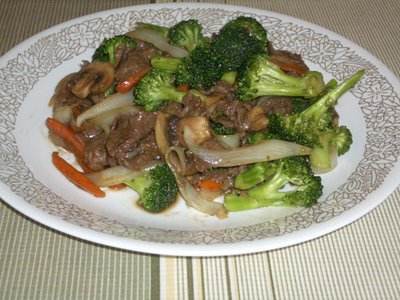
Today is Fourth of July here in the States, and we will be going to a BBQ (I don't think there will be rice), so I cooked broccoli & beef for lunch. That's a popular dish at a Chinese restaurant, but it's easy to make, so here it is.

IN JAPANESE: Gyuniku to broccoli itame
CATEGORY: Meat
COOKING METHOD: Stirfried
DIFFICULTY: Medium
SERVES: 2 people
LENGTH OF TIME: 15 min

INGREDIENTS:
5-6 thin sliced beef
1 head of broccoli
1/4 onions
some carrots (optional)
some mushrooms (optional)
1 clove of garlic finely chopped
1/2 TBsp sesame oil
1/2 TBsp vegetable oil
2 TBsp oyster sauce
some pepper

HOW TO:
Warm up your wok and pour 1/2 table spoon of sesame oil and vegetable oil. I like to mix oils like that since that gives better flavor.

After the oil gets hot, cook the finely chopped garlic until the garlic flavor soaks into the oil (should be about a minute when the garlic pieces turn slightly brown).

Throw in all the vegetables and stir fry for about a minute, and then add the slices of beef to the wok.

When the beef is 90% cooked, pour the oyster sauce and some pepper into the wok and stir fry for about a minute more until all the sauce is evenly mixed with the beef and vegetables.

That's it! And serve with rice.

Thursday, June 22, 2006

Shiso Wrapped Asparagus

I got back from the World Cup trip a couple of days ago. It was an amazing experience. I was never particularly a soccer fan, but after being part of attending the game, I am now hooked. My wife and I have been going to the nearby British pub called George & Dragon (famous for showing soccer matches) every night to watch the other games.

During this trip, I spent about 4 days in Germany, and four more days in Spain. I enjoyed the beers and pastries in Germany, and fell in love with seafood in Spain, particularly the octopus dish called "Pulpo ala gallego." I've been to Europe before on my own, but this time I had local friends show us around, which was ten times better than following a guidebook.

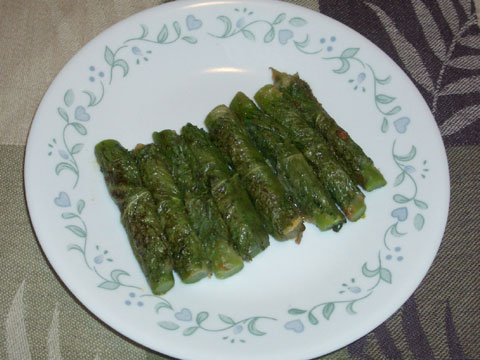
I'll have to write more about my trip, but for now, let me introduce today's recipe. I'm sure this exists, but I've never seen it offered at restaurants. My mom used to make this years ago, and recently I somehow remembered about it, and decided to make it myself.

IN JAPANESE: Asparagus no shiso maki
CATEGORY: Side-dish, Vegetarian
COOKING METHOD: Stirfried
DIFFICULTY: Medium
SERVES: 2 people
LENGTH OF TIME: 15 min

INGREDIENTS:
8 shiso leaves
4 fresh green asparagus
1 TBsp miso
1 tsp mirin
1 tsp sake
1/2 TBsp vegetable oil

HOW TO:
In a small bowl, mix miso, mirin and sake until it becomes a smooth paste.

Cut the asparagus into similar length as the width of shiso leaves, and boil for 3 minutes.

While the asparagus is being cooked, gently wash the shiso leaves and pat them dry with a paper towel. Lay them flat, and pour about 1/3 teaspoon of miso-mirin-sake paste on top.

Scoop the boiled asparagus pieces from the pot, and pat them dry with a paper towel. Place a piece of asparagus on top of the shiso leaves and carefuly take one end of the shiso leaf and wrap the asparagus. Don't worry if some of the miso paste comes out from the sides.

After all the aparagus pieces are wrapped by shiso leaves, pour some oil in a heated pan and carefully stirfry them for a minute or two, rotating them around so they are evenly cooked. Remember, the asparagus is already cooked, so you don't need to stirfry for too long!

Wednesday, June 07, 2006

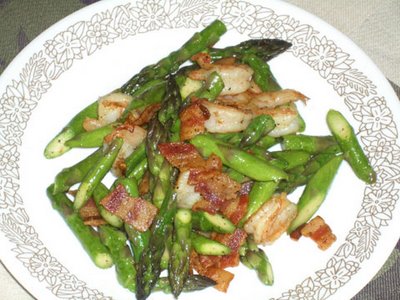
Asparagus & Bacon

After a couple of months of sending out resumes and interviews, I finally got a job offer from my number 1 pick. I won't say here what company I will be working for, but I will be working in the tallest building on the West coast. It's a big relief as I will be leaving for Germany tomorrow for a World Cup game (Japan vs Australia), and I wanted to find out the answer before I was out of town for 10 days. With this job, I will be dealing a lot with Japan, so I will probably have to stay late to coordinate with their time zone. Hopefully I can still continue to cook.

It's still the asparagus season, so today I'll introduce an easy but tasty side dish using asparagus.

IN JAPANESE: Asparagus to Bacon
CATEGORY: Meat, Side dish
COOKING METHOD: Stirfry
DIFFICULTY: Medium
SERVES: 2 people
LENGTH OF TIME: 10 min

INGREDIENTS:
3-4 slices of bacon
6-8 sticks of asparagus
some shrimp (optional)
some salt and pepper

HOW TO:
Cut slices of bacon into small pieces (about half an inch wide), and cook them in a frying pan to your preference (if you like crispy bacon, then cook it long time).

While the bacon is being cooked, wash the asparagus and chop them into bite size pieces.

Add the asparagus to the pan (add the shrimp as well if you are using it), and stir fry for about 3 minutes until asparagus looks rich and green.

Season with some salt and pepper and serve.

Wednesday, May 31, 2006

Tender Pork

I had a bit of cold this past week, so I haven't had a chance to update my blog. While I was sick, my wife and I got to catch up on some of the TV shows. I have Media Center on my computer, which can operate like Tevo, so we record whatever we are interested in. It's nice since we can fastforward all the commercials. We had been going out or busy for some reason or another, so we were about 30 hours worth of TV shows behind. Nice thing about having it on my computer is that we can skip all the crap. On some shows, like American Idol, we can watch the two hour show in an hour, since we fast forward all the commercials plus any time Ryan Seacrest is speaking.

Speaking of which, the gray haired Taylor Hicks won the Idol. Some article compared to him as the PT Cruiser, he is old but he is also new. I thought that was funny. I heard that this season was better than the previous years. I enjoyed the finale with all the guests this year. Hopefully the producers can make the next season just as successful and entertaining.

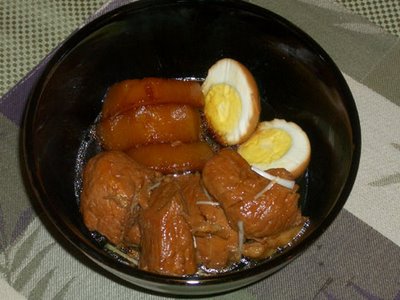
Alright, so this site is supposed to be for "easy Japanese recipes" but I think I will post some difficult recipes once in a while. When I say difficult, all that means is that it just takes more time, like butanokakuni I'm introducing today. There doesn't seem to be any official name for this dish in English, so I'm going to call it "tender pork." I read on Obachan's Kitchen & Balcony Garden blog that it's commonly called "braised pork belly" or in Hawaii called, "shoyu pork" but they didn't strike me, so I decided to choose something else. My wife used to call it "two-day pork" since the izakaya near our apartment in Yokohama advertised their kakuni as "super tender from being cooked for two days."

IN JAPANESE: buta-no-kakuni
CATEGORY: Meat
COOKING METHOD: Boiled
DIFFICULTY: Difficult
SERVES: 2 people
LENGTH OF TIME: 4 hrs
INGREDIENTS:
1 lb of big pork chunk
1 tsp oil
6 half inch pieces of ginger (see TIP: Ginger)
2 green onions (just the green parts)
1 cup of sake
1 TBsp brown sugar
1 TBsp regular white sugar
1/2 cup soy sauce
1/4 cup mirin
some daikon (optional)
2 boiled eggs (optional)

HOW TO:
Normally in Japan, people use the fatty belly part of the pork for this dish. But I find that most American people, including my wife, take the fat off when they eat. What a waste, considering that about a third of the belly meat is fat. So this time, I decided to try using a non-fatty pork part. I'm not sure how common this is, but I found a pork chunk called "country style ribs" at my supermarket, which oddly was boneless.

First cut your choice of pork into pieces. They should be about twice the bite size.

In a sauce pan, drop about a teaspoon of vegetable oil and turn the heat to medium. When the oil is hot, put the pork pieces in the pan. Rotate the pieces on all sides until they are no longer pink on the outside. Fill the pan with 2 cups of water and 1 cup of sake (I used 1/2 cup of cooking sake and 1/2 cup of real sake), and reduce the heat to low. Add pieces of ginger and green parts of the green onion as well. Don't use the lid, as the alcohol in sake needs to evaporate.

Let it simmer for 2 to 3 hours (if you have time, I recommend 3 hours, but 2 hours is fine, too). While you let it simmer, add some water every half an hour to make sure that all parts of the pork stay under the water at all times.

Tear a piece of pork after it had been cooking for 2 to 3 hours and make sure it's really tender (it should be from all that sake and cooking!!) Then take out the ginger and green onions out. If possible, take the pork pieces out, and strain the soup into a separate pan, so you will have much cleaner soup stock for the next step.

Place the pork pieces back into a pan with cleaner soup stock. If you want to add daikon and boiled eggs, this is your time to do it. Just make sure that water level is higher than your food (if not, add more water). Add 1 table spoon of brown sugar and another table spoon of regular white sugar. If you don't have brown sugar, 2 table spoons of regular sugar is fine, too. Also add 1/4 cup of soy sauce and 1/4 cup of mirin. Let it simmer on low heat for half an hour.

Add 1/4 cup more of soy sauce, and let it simmer for half an hour longer. Adding this half of soy sauce later helps pork from getting too salty from soy sauce. And the pork pieces should be mighty tender by now. You could garnish it with thinly sliced white part of the green onion like I did.